
The appengine-mapreduce library provides a powerful framework for processing large amounts of data with many distributed nodes running in parallel. Say you wanted to iterate over millions of exercise attempt records and summarize them into a handful of aggregate statistics. Since each of these records are independent, why not process them in parallel batches, with only a couple thousand records per node (a.k.a. shard)? With appengine-mapreduce, you can easily spin up machine instances inside the appengine datacenters for each of your shards, assign work to them, and then coalesce the results.
The library has its quirks, but thankfully the source code is available for exploring and tinkering with. Here’s what I’ve learned from working with it over the past few months.
There are actually two implementations of mapreduce in this library. The first implementation is based on taskqueues, while the second adds another layer on top of this with the appengine-pipeline library. The taskqueue implementation is a little easier to work with, but the pipeline implementation has more functionality. Both implementations share a set of input_readers and output_writers, which should allow you to execute most common operations out of the box. You can read the documentation about these classes, but here is a quick summary. The input_readers provided are:
- DatastoreInputReader – which maps over batches of entities in the datastore.
- DatastoreKeyInputReader – which maps over batches of entity keys. You need to do this if the work done in the handler must be transactional.
- DatastoreEntityInputReader – like DatastoreInputReader, except it returns Entity objects instead of casting them into your Model class.
- BlobstoreLineInputReader – maps over lines in files stored on the blobstore. This will split a single big file into chunks if the number of shards is greater than the number of files.
- BlobstoreZipInputReader – maps over files in a single zip archive stored in blobstore. Each file is the finest level of sharding granularity, so you must have many more files than shards to effeciently spread the load amongst shards.
- BlobstoreZipLineInputReader – maps over lines in files in many zip archives stored in blobstore. Shard boundaries are at blobs or files within the archives.
- RandomStringInputReader – a test class that randomly generates strings.
- ConsistentKeyReader – extends DatastoreKeyInputReader but uses some magic to apply outstanding writes before giving you results.
- NamespaceInputReader.
- RecordsReader – used internally by MapreducePipeline to shuttle data between the map, combine, and reduce phases.
- LogInputReader – maps over a time range of appengine logs using the LogService API.
And the output_writers are:
- FileOutputWriter – writes output to a single file, or one file per shard, based on the output_sharding parameter. I’ve only used this one.
- FileRecordsOutputWriter – used internally by MapreducePipeline to shuttle data between the map, combine, and reduce phases.
- KeyValueFileOutputWriter – extends FileRecordsOutputWriter.
- BlobstoreOutputWriter, BlobstoreRecordsOutputWriter, KeyValueBlobstoreOutputWriter – same as the above classes, but specifically uses the blobstore API instead of the Files API.
Taskqueue Mapreduce
The getting started guide describes how to setup the mapreduce library and define your first jobs in the mapreduce.yaml file. The user guide then offers a little more detail on the input readers available, and discusses how you can feign the unimplemented reduce step with another query inside your map handler. This works OK if each output from the map step requires a small amount of work, but if each map output produces a lot of work that should be processed in parallel with many reducers, you should look into the pipeline implementation, discussed below.
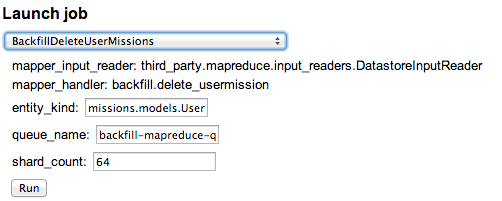
After you’ve setup the mapreduce library and uploaded a mapreduce.yaml with an appropriately configured job, you can navigate to /mapreduce on your webapp and launch your job from the bottom of the page.
Then your job will show up on the list of running and completed jobs.

And you can click on it to see details of the execution.

But, instead of going to this page to launch jobs every day, why not create a cron job to do that for you? For this, you need to use control.start_map(), which is the function that the Launch job UI calls under the hood. The mapreduce.yaml file just provides a convenient wrapper around this API. For example, a job specified in mapreduce.yaml:
mapreduce:
- name: <A descriptive name, e.g. DataStoreMigrationBackfill>
  mapper:
    input_reader: mapreduce.input_readers.DatastoreInputReader
    handler: <your handler name, e.g. main.process>
    params:
    - name: entity_kind
      default: <your entity name, e.g. main.MyEntity>
Could, instead, be started with this control.start_map() call:
control.start_map(
  name="<A descriptive name, e.g. DataStoreMigrationBackfill>",
  handler_spec="<your handler name, e.g. main.process>",
  reader_spec="mapreduce.input_readers.DatastoreInputReader",
  mapper_parameters={
    "input_reader": {
      "entity_kind": "<your entity name, e.g. main.MyEntity>"
}})
Now you can put this code inside of a GET handler and fire a cron job against it!
Here’s a quick list of gotchas and tips to aid in debugging your mapreduce jobs:
- The DatastoreInputReader has a filters parameter to decrease the number of entities passed to your map handler. But, it will only do equality filtering, and only for values that are JSON-serializable. Which notably excludes DateTimeProperty, but you can workaround this by adding a computed property that is stored as a string.
- The Datastore* and Blobstore* input_readers enforce a MAX_SHARD_COUNT of 256, but I’m not exactly sure why.
- The mapreduce library swallows exceptions that are thrown from your handler functions, so I always wrap everything in a try..except block that will pass the exception to logging.error() before re-raising it.
- If your mapreduce job seems to be hung, you should first inspect the taskqueue that it is running on to see why the task is failing. From there, you can grep the logs for the mapreduce ID to find more information.
- In the common case that your map handler alters the incoming entity and then writes it again, you should always use the `yield op.db.Put()` pattern so the mapreduce library can batch your writes together.
- To mapreduce over the subclass of a PolyModel, you should specify the base class for entity_kind parameter, and then filter out everything else in the map handler, as described here.
MapreducePipeline
The taskqueue implementation provides the core functionality for sharding and coalescing your data, but only offers 1 level of parallelization: the map handler. The MapreducePipeline class solves this problem by wrapping the task-based mapper with some convenient pipeline jobs which allow you to specify a map, reduce, and even combine handler. Google has provided some pretty good examples that go into the details of implementing these phases, except for the combine.
A combine phase can be used to take advantage of the fact that the RecordsReader used by the MapreducePipeline library will actually read results from disk in batches. The combine handler may coalesce results within the batch before passing them on to the reduce phase, which will decrease the amount of data passed into the reduce phase, and therefore allow your job to complete faster. The Hadoop MapReduce engine also implements this mechanism.
To add a combine phase, you must specify a handler that takes output from map() and/or other combine()s and emits results for the reduce(). The handler is also aware of previous values that were built up for the current shard and can use that to its advantage. The example I came up with to test this parameter is to remove duplicates before outputting the final result set. Here’s a boiled down version, or you can look at the raw code I used to run this test.
def map(data):
    key = random.randint(1, 10)
    yield (key, data)

def combine(key, new_values, old_values):
    old_values = set(old_values)

    for value in new_values:
        # Remove duplicates
        if value not in old_values:
            old_values.add(value)
            # NOTE: Do not re-emit the key
            yield value

def reduce(key, values):
    for v in values:
        yield "%s - %sn" % (key, v)

pipeline = mapreduce.mapreduce_pipeline.MapreducePipeline(
    "test_combiner",
    "main.map",
    "main.reduce",
    # A debug input_reader provided by the SDK for testing purposes
    "mapreduce.input_readers.RandomStringInputReader",
    "mapreduce.output_writers.BlobstoreOutputWriter",
    combiner_spec="main.combine",
    mapper_params={
        "string_length": 1,
        "count": 500,
    },
    reducer_params={
        "mime_type": "text/plain",
    },
    shards=16)

pipeline.start()
print pipeline.pipeline_id
This example uses the RandomStringInputReader to output 500 strings of length 1. Since there are 16 shards, each shard outputs 500/16=31 strings. Each string is sent to the map() function which assigns it to a random bucket from 1 to 10. The combine() function is called with the key output from the map() and a list of new_values and old_values. The new_values may be the output from map() or other combine() calls. The old_values are what the mapreduce library has collected to be sent to the reduce() call, so you may change your output based on what has already been collected. In this case, we only output new values. Finally, the reduce() step simply outputs a string that the BlobstoreOutputWriter writes to a file in the blobstore.
Here is an example output from this job:
1 - d
1 - h
1 - v
8 - z
8 - m
8 - v
8 - b
8 - i
<...>
If you take a look at the mapreduce status page, you will see that MapreducePipeline actually spins up many instances of control.start_map() jobs under the hood.

These can be a pain to sort through when debugging. I’ve found it much easier to use the pipeline.pipeline_id returned by the MapreducePipeline to look directly at the pipeline status page. This builds up a nice hierarchical view of the various stages of the mapreduce and also grabs the statuses for the individual control.start_map() jobs. The status page can be accessed at /mapreduce/pipeline/status?root=<pipeline.pipeline_id>.

Implementing your own Pipeline jobs
Now that we know how to launch the predefined MapreducePipeline, let’s take a look at implementing and running our own custom pipeline jobs. The pipeline library provides a low-level library for launching arbitrary distributed computing jobs within appengine, but, for now, we’ll talk specifically about how we can use this to help us chain mapreduce jobs together. Let’s extend our previous example to also output a reverse index of characters and IDs.
First, we define the parent pipeline job.
class ChainMapReducePipeline(mapreduce.base_handler.PipelineBase):
    def run(self):
        deduped_blob_key = (
        yield mapreduce.mapreduce_pipeline.MapreducePipeline(
            "test_combiner",
            "main.map",
            "main.reduce",
            "mapreduce.input_readers.RandomStringInputReader",
            "mapreduce.output_writers.BlobstoreOutputWriter",
            combiner_spec="main.combine",
            mapper_params={
                "string_length": 1,
                "count": 500,
            },
            reducer_params={
                "mime_type": "text/plain",
            },
            shards=16))

        char_to_id_index_blob_key = (
        yield mapreduce.mapreduce_pipeline.MapreducePipeline(
            "test_chain",
            "main.map2",
            "main.reduce2",
            "mapreduce.input_readers.BlobstoreLineInputReader",
            "mapreduce.output_writers.BlobstoreOutputWriter",
            # Pass output from first job as input to second job
            mapper_params=(yield BlobKeys(deduped_blob_key)),
            reducer_params={
                "mime_type": "text/plain",
            },
            shards=4))
This launches the same job as the first example, takes the output from that job, and feeds it into the second job, which reverses each entry. Notice that the result of the first pipeline yield is passed in to mapper_params of the second job. The pipeline library uses magic to detect that the second pipeline depends on the first one finishing and does not launch it until the deduped_blob_key has resolved.
Next, I had to create the BlobKeys helper class. At first, I didn’t think this was necessary, since I could just do:
mapper_params={"blob_keys": deduped_blob_key},
But, this didn’t work for two reasons. The first is that “generator pipelines cannot directly access the outputs of the child Pipelines that it yields”. The code above would require the generator pipeline to create a temporary dict object with the output of the first job, which is not allowed. The second is that the string returned by BlobstoreOutputWriter is of the format “/blobstore/<key>”, but BlobstoreLineInputReader expects simply “<key>”. To solve these problems, I made a little helper BlobKeys class. You’ll find yourself doing this for many jobs, and the pipeline library even includes a set of common wrappers, but they do not work within the MapreducePipeline framework, which I discuss at the bottom of this section.
class BlobKeys(third_party.mapreduce.base_handler.PipelineBase):
  """Returns a dictionary with the supplied keyword arguments."""

  def run(self, keys):
    # Remove the key from a string in this format:
    # /blobstore/<key>
    return {
        "blob_keys": [k.split("/")[-1] for k in keys]
    }
Here is the code for the map2 and reduce2 functions:
def map2(data):
    # BlobstoreLineInputReader.next() returns a tuple
    start_position, line = data
    # Split input based on previous reduce() output format
    elements = line.split(" - ")
    random_id = elements[0]
    char = elements[1]
    # Swap 'em
    yield (char, random_id)

def reduce2(key, values):
    # Create the reverse index entry
    yield "%s - %sn" % (key, ",".join(values))
Here is an example output from the first job (same as the above example):
1 - d
1 - h
1 - v
8 - z
8 - m
8 - v
8 - b
8 - i
<...>
And here is an example output from the second (and final) job:
i - 1,8,6,9,4,7,2,5,10,3
m - 1,8,6,9,4,7,5,10
q - 1,8,6,9,4,2,5,3
u - 6,9,4,7,5,10,3
This was not an easy example to get working. Here are some notes I took from the problems I hit.
- Everything must inherit from mapreduce.base_handler.PipelineBase, not mapreduce.lib.pipeline.Pipeline, because PipelineBase does some weird manipulation of the import strings. I don’t fully understand this, but there it is. Let me know if you come up with a better explanation / solution.
- You cannot use the helper classes in pipeline.common, such as pipeline.common.Dict, because they inherit from mapreduce.lib.pipeline.Pipeline instead of mapreduce.base_handler.PipelineBase.
- While debugging locally, don’t hesitate to add logging.error() calls in the mapreduce and pipeline libraries themselves. I had to do this on several occasions to get some useful error output. The MapperWorkerCallbackHandler .handle() and .process_data() are particularly useful places to debug, since these are the functions which call into your code.
Creating your own Input Reader or Output Writer
The mapreduce library provides readers that iterate over entities in the datastore, or lines in a file of various format. The writers provided will serialize your output to a set of files on the blobstore in a few formats. These will usually get the job done, but there may be scenarios where you need a custom reader or writer. For example, if you want to map over entities from several disparate Models, or if you want to write output in a different format than what is provided.
At Khan Academy, we have one custom input_reader running in production, and I have created a proof-of-concept custom output_writer. You can find both here. The ContentRevisionsInputReader iterates over entities from many different Models, such as TopicRevision, VideoRevision, ExerciseRevision. The CustomMultiFileOutputWriter overloads FileOutputWriter to write to different files based on the value of the output. In this case, it writes even numbers to one file and odd numbers to another file.
Instead of walking through the steps to develop your own reader or writer, which can get tedious, I’ll just leave you with some notes about how the control.start_map() code calls each of the functions on these classes. These notes are basically a summary of my understanding of the code within mapreduce/handlers.py. If you work through your own example, don’t forget to add logging statements in there!
- validate() is called on both the input_reader and output_writer to verify that the parameters passed in are correct and that the classes can correctly instantiate.
- input_reader.split_input() is called, which in turn calls input_reader.__init__() for each shard.
- output_writer.init_job() is called to initialize the global output_writer state.
- Each input_reader instance calls output_writer.create() to initialize the stream from the input_reader to the output_writer.
- to_json() is called on all of the instances, and this is sent to all of the shards. Each shard this calls from_json() to re-claim the input_reader and output_writer instances that had been created before.
- Each shard calls input_reader.__iter__() to retrieve the raw data, and sends that to the handler specified in the control.start_map() call.
- The output from the handler is then passed to the output_writer.write() method.
- After all shards have completed, output_writer.finalize_job() is called to close any files that were created.
I hope this post has helped you in your distributed computing adventures. Let me know if you make anything interesting, or have any questions or comments!
